Wednesday, September 18, 2013

Mikko's Bacon Grilled Mushrooms

I have been to Finland a couple of times.  The last time was in the summer of 2011 where I met my cousin and my host brother, Mikko.  He took us to their summer cabin where he grilled for us.  One of the things that we had as an appetizer were these wonderful bacon wrapped mushrooms.  They are filled with a mild blue cheese and as the cheese melts and the bacon crisps it all comes together in a mushroom cup.  These are best served nearly immediately off the grill, but be careful not to burn yourself on the lovely melted blue cheese.


Mikko's Mushrooms

Mushrooms - your choice the type
8 oz. blue cheese
bacon

Wash the mushrooms and remove the stem.  They should just pop out.  You want a nice sized cap, but not too big.  Ideally, you want the same number of mushrooms as bacon slices.  Divide the blue cheese into how many mushroom pieces you have.  Stuff the blue cheese into the cap of the mushroom.  Then wrap the bacon around the outside of the mushroom.  Grill until the bacon is crisp.  Serve after a few minutes while the cheese is still not, but not too hot!

Serves 4-6

Friday, September 13, 2013

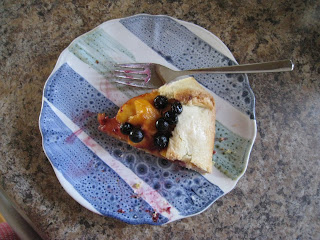
Rustic Peach and Blueberry Tart


I ordered Palisade peaches this year and received the box not too long ago.  While I prefer nectarines to peaches (there is just something about the fuzz that drives me crazy when it sticks to me), these peaches are delicious.  They are also shipped all over the U.S.  One year I was in the grocery store when the first of the season had come in.  I bought some and went back for more.  I picked one up and it was so large that I could hardly hold it in one hand.  Out of curiosity I put in on the scale and it weighed nearly a pound.  I had to try it.  Sometimes the larger the vegetable or fruit it, the less good it is, but this was not the case, though it was quite filling!


  At any rate, I have been looking over recipes for ideas for my peaches.  I came across this one from the Back in the Day Cookbook.  It is a close adaptation of the one in the book by Griffith and Cheryl Day.  I was also impressed by their recipe for the crust.  I haven't made one with cornmeal in it, but it was beautifully balanced and turned out well. (Though for some reason dough likes me, though I don't particularly like it.)


Rustic Peach and Blueberry Tart
3 ripe peaches, peeled and sliced
1.5 cups fresh or frozen blueberries (I freeze them from fresh.)
2 tablespoons vanilla sugar

Put the peaches, blueberries and vanilla sugar in a bowl and let sit for at least 1 hour.

Meanwhile, make the crust:
1.5 cups flour
1/3 cup cornmeal
2 Tablespoons sugar
pinch of salt
8 tablespoons cold unsalted butter
water to bring dough together

Heat oven to 425f.  Line a baking sheet with parchment paper.  In a medium bowl, mix together the dry ingredients.  Cut in unsalted butter until incorporated into course texture.  Add water sufficient to bring the dough just together.  Add slowly so your dough doesn't get too wet.  Roll out into a 12 inch circle.

Pour the peaches and blueberries into the center of the dough allowing a 2 inch circle around the edges.  Fold the edges over the fruit.  Pour the juice from the berries and peaches into the center.  Brush the crust with milk and dust with sugar.  Bake for about 30 minutes or until the crust is golden brown.  Remove from oven and let cool for at least 5 minutes.  Serve warm.

This is also delicious cold and will keep a few days in the refrigerator.  It would also be wonderful with a scoop of ice cream.  Serves about 8, cut small pieces.


Monday, September 9, 2013

Zucchini Carbonara Pasta

Zucchini Carbonara Pasta

Fresh zucchini simply cannot compare to the ones you find in the grocery store.  Fortunately, a couple of fresh granted me zucchini from a part of farm share.  Ironically, both people that gave me zucchini gave it to me the same week and I ended up with three different kinds of it.  So I started reading and trying to find some recipe or ideas which would work with this lovely fresh zucchini.  Some got grilled with another meal, and some parts were used in a lovely mint, zucchini and farro salad.
The last of my zucchini was used in this recipe for a carbonara pasta with zucchini.  As I had never made carbonara before, I was a little concerned about cooking the eggs and turning the whole thing into a mess, but alas it did not happen.  Not only did it not happen, but it also did not happen upon reheating the pasta for leftovers.  Also, it did reheat well and was just about as good as the first time.  Not quite only because there is just something wonderful about the smell of cooking bacon which sets the expectations that much higher.


This recipe is adapted from Jamie At Home by Jamie Oliver. I was given a couple of his cookbooks and though I wasn't thrilled with others that he has written, a few of them have stuck me as great ideas for cooking.

Zucchini Carbonara
1 yellow squash, cut into smaller square pieces
1 green zucchini, cut into smaller square pieces
1 multicolored green striped zucchini, cut into smaller square pieces
1 pound penne pasta
2 large eggs yolks (best you can get)
1/2 cup heavy whipping cream
freshly grated good quality Parmesan cheese
olive oil
bacon - 1 pound cut into smaller strips
4-6 smaller pieces of fresh thyme (depending on your taste)
salt and pepper

Boil the pasta.  While water is heating and the pasta is boiling...you will make the carbonara sauce.  Put the two egg yolks into a small bowl.  Add the cream and 3-4 tablespoons of freshly grated Parmesan cheese.  Mix together with a fork.  Season a little with salt and pepper.

In a large frying pan, add 1-2 tablespoons of olive oil.  Fry the bacon until crisp.  Add the squash and zucchini.  Sprinkle in the thyme leaves, salt and pepper (though you probably don't need much salt due to the bacon).  Stir well until everything is coated in the bacon grease and olive oil.  Fry until everything is lightly golden brown.

When the pasta is done, drain it, but reserve some of the water (a cup is plenty).  Immediately toss with the bacon zucchini squash mixture.  Remove from heat.  At this point you may need a little of the pasta water to add with your carbonara sauce.  Be sure everything isn't too hot or else you will cook the egg yolks.  The pasta water it to help give a shine to the pasta, but you may not need to use it or choose not to use it.  Taste and adjust for seasoning with salt and pepper if needed.  Serve immediate with freshly grated Parmesan cheese.

Serves 4-6 depending on portion sizes

Sunday, September 8, 2013

Farro Salad with Mint, Zucchini and Feta Cheese

Farro Salad with Mint, Zucchini and Feta Cheese

I few weeks before I made this salad I made another using farro (http://invitedtodinner.blogspot.com/2013/08/summer-farro-salad-with-tomatoes.html).  I had forgotten how much I liked the texture and flavor of this ancient grain.  Since I still had some remaining and I was given some zucchini, I decided I should really cook it again and soon.  This recipe is adapted from Jaime Oliver's America.


I have been hesitant to try mint with other savory foods, but I am not sure why.  Maybe because I think it is simply wonderful as a drink and couldn't quite figure out how that would work in a salad.  Peppermint however is very different from sweet mint which I used in this recipe.  It also compliments zucchini very well.  I also used a sweeter Anaheim red pepper for this recipe which while not very spicy, complimented the flavors as well.  Finally, the feta sets everything off so don't forget to add it!

Farro Salad with Mint, Zucchini and Feta Cheese
1 cup farro, cooked with chicken stock
olive oil
1 small-medium zucchini
1 small-medium yellow squash (or just double the zucchini)
4 cloves garlic, peeled and thinly sliced (or pressed)
2 fresh Anaheim chiles
3-4 scallions, chopped into thin slices
1 lemon
feta cheese - about 1/3 pound or to your taste, cubed or crumbled into smaller pieces

Cook the farro with the chicken stock for about 20 minutes or until cooked, but not mushy.  Drain and set aside.  In a medium pan (or large enough for vegetables and farro), put 1-2 tablespoons of olive oil (I rarely measure, but enough to coat the zucchini when hot).  When the oil is hot (use a medium-high heat) add the zucchini, squash, garlic and most of your red chiles.  When the zucchini and squash starts to brown, add your scallions, most of the mint and then salt and pepper to taste (though at this point it is better to use little since there will be salt from the stock as well).  Grate in the zest from the lemon and then add the juice as well.  Add a little more olive oil to be sure nothing is sticking to the pan.

Add the farro and toss everything together, making sure that everything has been well mixed.  Remove from heat and let room to room temperature.  Fold in the rest of your mint and your crumbled feta cheese.  I also added some leftover scallions.  Serve at room temperature, but this also keeps well in the refrigerator.

Serves 2-4

Monica's Norwegian Bread

Monica's Norwegian Bread
I was visiting a friend of mine in Norway this year, and while I was there she made this bread.  We ate it many mornings we were there with all sorts of good things on top.  Now, in our house, it is called Monica's bread.  Monica's bread brings back the light filled days and nights of a summer in Norway.


This is a simple yeast bread to make and if you haven't liked baking bread or have not yet tried it, this is a nice one to start with as there is no kneading involved.  This is a more plain flavored bread, which means that it is wonderful to eat with other things piled high on it.  I just ate a piece of it with some freshly made ricotta cheese.  (You can read about homemade cheese on this page: http://invitedtodinner.blogspot.com/2012/02/making-homemade-cheese.html). Other things which I have recently piled on bread have been heirloom tomatoes (which have much better flavor than traditional ones) with a dash of feta cheese.

At any rate, while this bread must sit a while to rise, no kneading is required.  This recipe also makes three loaves, which you can eat up, give away or freeze, though it is always better eaten fresh.

Also, please note when making bread in particular it is best to have a scale to weigh the ingredients as it is a more precise way of baking and your results will be more similar, particularly if you grind your own grains.

Monica's Norwegian Bread
1 kg white flour
1 kg whole wheat flour
4 cups oatmeal
1 Tablespoons seeds (in this loaf I used sesame and sunflower as that is what I had on hand)
1 Tablespoon salt
7 grams dried yeast
2 liters room temperature water

Mix all the ingredients.  Leave the dough to sit at room temperature for at least 2 hours, though overnight is great too.   Pour the dough into three bread tins.  (I used parchment to be sure the bread would not stick, but there wasn't a problem getting it out of the tins.)  Put the loaves of bread into a cold oven.  Turn on the oven to 210F for 15 minutes.  After 15 minutes, turn the temperature up to 400F for 2 hours.

Makes 3 delicious loaves

Tzatziki

Tzatziki

For anyone who has tried tzatziki and wanted to make it at home, you should know that it is very simple.  There are several different variations out there, but this is the version I have been making for many years now.  It was based off a recipe from Greece that a friend gave me long ago.  It is great as a dressing on salad or just with warmed up pita bread.  It is nice and refreshing on a hot day.

Tzatziki
greek yogurt (1-2 cups)
cucumber - seedless is preferable, but not necessary
dill
garlic
salt and pepper

This is the basic recipe I use.  I did not include amounts because it depends on what you get for ingredients.  The thicker the yogurt, the more cucumber I add. (The cucumber should be shredded.  I use a box grater.  You can use the size you like, but I like the thicker pieces in mine.) I stir until I get the consistency that I like.  Dill - buy fresh and it will add such a refreshing flavor to the yogurt. I usually finely chop or press if I am being lazy 2-3 cloves of garlic, but add as much or as little as you like.  Add salt and pepper to taste once everything else has been added.