Friday, December 27, 2013

Creamy Garlic Potatoes - Gratin Style

I love gratins.  Simply put, but they are so easy to change and as long as your combinations take into consideration how thick it is, how much fat there is and liquid as well, you can make nearly anything into a gratin of sorts.  I first remember eating gratins when I was a child.  My mom called them scalloped potatoes, but I later learned of them as gratins.  My mom used to make scalloped potatoes with ham chunks in them.  I used to search for the crunchy top and the little chunks of ham.  I loved the while dish, but those two things made eating the scalloped potatoes so much more fun and interesting.  She also served them piping hot.  To this day food and drinks are not hot enough if I am unable to burn my tongue on them.  Of course I let them cool down, but I can stand quite a high temperature and those first few bites aren't always about the taste, but about the heat.

Later I remember making gratin potatoes when I lived in Germany.  I was visiting a friend of a friend and she was making them for dinner.  I helped out and remember the oodles of cheese and cream which were added to the potatoes with a touch of nutmeg.  It was such an interesting place to cook as it was an old farmhouse, heated with fire burning stoves.  The kitchen was huge, but had few work spaces, so the kitchen table became the place to put everything together, which made for a very social area for chatting while helping to cook.

So with those memories in mind, this gratin tends to be quite sweet with all the cream that is used.  The garlic also sweetens up in the roasting, so I would recommend a bit of cheese on top as the salt helps balance everything out.

Creamy Garlic Potatoes - Gratin Style
(based on Cook in a class of your own by Richard Bertinet)

8 medium potatoes
5 cloves garlic
parsley
4 tablespoon olive oil
salt and pepper to taste
2 cups heavy cream
sharp cheddar (shredded for sprinkling on top)

Preheat oven to 400F.  Use a mandoline and thinly cut all the potatoes.  Press or chop the garlic.  Chop the parsley.  Heat olive oil in a sauce pan.  Once hot add the potato slices and make sure all are tossed with olive oil.  Season with salt and pepper.  Once coated in oil, add the garlic and pour in cream to cover the potatoes.  Let thicken over low heat for about 5 minutes.  Stir in the parsley and place into a large baking dish.  (I used my oven roasting pan as I like a thin layer so the potatoes cook quicker, but you can use any size.)  Bake until golden brown.  Remove from oven and sprinkle cheese over the top.  Return to oven for a few minutes to melt the cheese.  Remove from oven and let cook for a few minutes before serving as everything should be very hot.

Wednesday, December 25, 2013

Spinach Quiche


I was baking so much the past few weeks, so I needed a break from all the sweet stuff and have added some savory recipes to balance out all of the high sugar content recipes.  Recently, I have been craving some nice greens.  Therefore, I went out and bought some spinach with is useful in so many ways.  It is such a versatile green that it is delicious eaten raw, but equally delicious chopped up and cooked.  This recipe is from my family in New Zealand.  It was one of the first things I learned to make when I was there, and I still go back to it when I am craving a piece of spinach quiche.

Spinach Quiche

Preheat oven to 400 F.

Crust:
1 cup flour
1 teaspoon baking powder
pinch of salt
4 tablespoons cold butter
ice cold water

Mix dry ingredients and then rub in the butter.  Add cold water by the tablespoon until dough comes together.  Roll out dough and place in a pie or quiche plate.

Filling:
4 eggs
salt and pepper to taste
1/4 teaspoon nutmeg (less if you want the flavor more subtle)
3/4 cup milk
1/2 large onion
spinach to taste, though at least 1.5 ounces
1 cup grated cheddar cheese

In a food processor with the cutting blade place the eggs, salt and pepper, nutmeg and milk.  Blend in and add the onion and spinach leaves.  Finally, mix in the grated cheese.  Pour the filling into the pie plate.  Place in oven for about 45 minutes or until gently set.  (It should not be liquid in the middle so judge the time based on how wiggly the middle is.)

Makes one pie plate (about 8 servings)

Tuesday, December 17, 2013

Red Bean, Tomato and Beef Chili

There are as many types of chili out there as you can possibly think of to make.  Actually, I went to a chili cook-off this year and I was quite surprised at some of the combinations people used to make chili.  This basic red chili started from a recipe a friend gave me.  I never made red chili often as my husband loves my white chicken chili.  I was never very thrilled to make this recipe as I thought just throwing stuff in a pot wasn't all that great and the flavors weren't coming through like they should.  Since then I have made this chili and started to change things up to it is more to what I like in chilli.  The flavors have started to come out which has turned this chili from a bland, canned chili to one much more outstanding.  I think I will continue to tinker with this recipe until it has the perfect union of spice, bean and meat.


Red Bean, Tomato and Beef Chili
1 pound ground beef
2-3 cloves minced or finely chopped garlic
3 teaspoon chili powder
1/2 teaspoon cumin
1/2 teaspoon chipotle pepper powder
1/2 teaspoon spicy Hungarian paprika
1/2 teaspoon ground pepper
1 15 oz. can red kidney beans (drained)
1 15 oz. can pink kidney beans (drained)
1 14 oz can diced tomatoes with celery, onions and green pepper
1 10 oz. can tomatoes with green chiles
12 oz. tomato paste
2 cups water (more if too thick)

Brown hamburger with cumin and minced garlic.  Once browned drained the fat and add to a stock pot.  Add the 5 canned ingredients, 2 cups water and additional spices to the stock pot.  Bring to a boil, then turn down the heat to low.  Let simmer for at least 30 minutes over low heat, though this is better the longer it has to simmer as the flavors will come together better.  Serve with corn bread or corn chips.

Monday, December 16, 2013

Peanut Butter Kisses


As you probably can imagine, this recipe gets it's name from the lovely combination of a peanut butter cookie topped with a Hersey Kiss.  These are also a simple cookie to put together.  I think the longest most laborious part of these cookies are unwrapping the Hershey kisses to place on the top.  Of course you could also just pipe some chocolate on top, but I like the way the chocolate kiss just melts slightly as they are baking.  These beautiful little cookies are just a nice Christmas twist on your typical peanut butter cookie.
Before baking...sugar coated and a Hershey kiss on top.

 Fresh from the oven.
 This recipe makes enough cookies for one bag of Hershey kisses.

Peanut Butter Kisses
1 cup butter
1 cup peanut butter
1 cup sugar
1 cup brown sugar
2 eggs
1 teaspoon vanilla
2 1/2 cups flour
1 teaspoon baking powder
1 teaspoon baking soda
1 teaspoon salt
1 bag Hershey Kisses, unwrapped

Preheat oven to 350 F.  Cream together butter, peanut butter, brown sugar and white sugar.  Mix until light and fluffy.  Once creamed add in the eggs, one at a time, vanilla and mix until incorporated.  Finally, mix in flour, baking powder, baking soda and salt.  Refrigerate dough for about 30 minutes.  Remove dough from refrigerator and roll into balls and dip into sugar.  Place them on a cold cookie sheet.  Please a Hershey Kiss in the middle of each cookie and bake for about 10 minutes.  Remove from oven and let stand 1-2 minutes to cool before moving to a cookie rack to cool completely.

Sunday, December 15, 2013

Salted Nut Rolls


Salted Nut Rolls remind me of my mom.  She was always making these for when one of my cousins came to visit from out of town.  She knew he liked them and as they are so quick and simple, she loved to do this small thing for him.  It also is another of the Christmastime favorites and are a bit like the Salted Nut Bars that Pearson's of St.Paul, MN makes.This is a quick bar to make and it doesn't even require you to turn on an oven, but you do need your stove top.


Salted Nut Rolls
16 oz jar of dry roasted peanuts
3 Tablespoons butter
11 oz. bag peanut butter chips
1 can sweetened condensed milk
10 oz. package of mini marshmallows

Grease the bottom of a 9 x 13 inch cake pan.  Pour 1/2 a jar of the dry roasted peanuts into the bottom of the pan.  In a medium saucepan, melt the butter, peanut butter chips and sweetened condensed milk over low hat.  Be careful not to let the mixture boil.  Once everything is melted, remove from the heat and stir in the mini marshmallows.  Spread this mixture carefully over the dry roasted peanuts in the bottom of the pan.  Pour the remaining peanuts over the top and press them in.  Refrigerate briefly (for about 15-20 minutes) and then cut into squares.  Makes one cake pan.

Thursday, December 12, 2013

Seven Layer Bars


There are many variations in 7 layer bars, but this is the one my family has been making for as long as I can remember.  There are seven sweet layers piled on top of each other and then baked into caramel bar goodness.  Again this is a relatively simple bar to assemble and bake.  I think the challenge comes into play when trying to wrench the bars out of the pan since the caramel has successfully secured the bars to the edges.  These bars also freeze well, so you can enjoy them for weeks to come if you already have too many sweets in the house for the Christmas season.  You can also vary the ingredients if desired by changing up the nut to a walnut, peanut, hazelnut or almond.  The chips you can change for a peanut butter, cinnamon, or white chocolate chip.  Really, the possibilities for other combinations are endless.  However, in the spirit of Christmas past, this is how my family has made these bars, and to bring back sweet memories this is how I made them again this year.


Seven Layer Bars
1/4 pound butter
1 1/4 cups honey graham crackers, crushed
1 cup coconut, flaked
1 cup chocolate chips
1 cup butterscotch chips
1 cup chopped pecans
1 can sweetened condensed milk

Preheat the oven to 350F.  Melt the butter in a 9x12 inch pan.  Once melted remove and coat the bottom of the pan.  Pour the graham crackers in making sure to cover the bottom of the pan.  Sprinkle the coconut, chocolate chips, butterscotch chips and pecans over the crust.  Finally, drizzle the sweetened condensed milk over the entire mixture.  Bake for 30 minutes or until everything has come together and the sweetened condensed milk is starting to look caramel colored.  Remove from the oven and let cool completely before cutting and removing the bars.

Wednesday, December 11, 2013

O'Henry Bars


This is one of my favorites to make and to eat.  The combination of oats, peanut butter and chocolate makes me sign.  This is also a bar which freezes nicely.  I used to eat these only frozen, but sometimes the oatmeal crust would separate from the peanut butter chocolate topping which would cause quite the dilemma...do I eat the chocolate only, but then what to do with the equally delicious crust?  Eat that along side or separately?  Not a terrible dilemma to have of course! 

These bars are many of the ones you can whip up pretty fast, so if they get eaten quickly you don't have anything to fear in just making more!  Plus, the chocolate peanut butter top is hard to resist!


O'Henry Bars
4 cups oatmeal
1 cup brown sugar
1/2 white sugar
1 cup of butter, melted
1 cup chocolate chips
3/4 cup peanut butter

Preheat oven to 350F.  Mix melted butter with the 4 cups of oatmeal, brown and white sugar.  Mix until well incorporated and pat into a greased 9x13 inch cake pan.  Bake this layer for 20 minutes.  Remove from oven and cool.  While the oatmeal layer is cooling, make the chocolate peanut butter topping.  Melt in a saucepan the chocolate chips and the peanut butter.  Stir continuously so that chocolate does not burn.  As soon as the chocolate chips are almost melted remove from heat and continue stirring until smooth.  Pour this mixture over the oatmeal layer.  Let cool to room temperature.  Once cooled, place in refrigerator for about 30 minutes to set the chocolate in order to be able to cut into pieces.

Tuesday, December 10, 2013

Christmas is coming....and so are Christmas cookies and bars

Since Christmas is just around the corner, I thought I would take some time this year to bake up some Christmas cookies.  So in my pursuits of Christmas cookie and bar baking, I am going to have a Christmas cookie week of posts.  I will include cookies and bars I have been baking up for years.  These recipes are ones my grandma's, my mom and my aunt would bake and they are the ones I still turn to to remember Christmas past.  Since we don't have family nearby to share our Christmas cookies with, this year I am delivering them to coworkers and students to eat themselves into a lovely sugar coma.  So stay tuned, I am preparing the recipes and photos and soon I will post a bunch! 

Thursday, December 5, 2013

Chicken Pot Pie Version 2

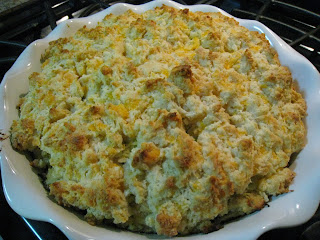
I have long been obsessed with a good chicken pot pie.  On this site I offer two...this one I am now writing about and another which I recently published (http://invitedtodinner.blogspot.com/2013/12/chicken-pot-pie.html).  These are two very different pot pies.  This one is not your regular, traditional pot pie.  First, it is topped with a biscuit crust instead of a traditional pastry topping.  Second, the meat portion of this pie is the main ingredient.  It also has a lovely cream sherry sauce which is added to the chicken so the flavor is unbelievable, but again not your traditional sauce.  I will have to make this a few more times to get used to the not your regular pot pie flavor.  Plus, I added a bit too much chicken so the portion was off a bit.  Another great thing about this is the it reheats well and the flavors continue to come together.  The biscuit is also very good and I really like the toasty crunchy bits.  This recipe is adapted from Pam Anderson's Perfect One Dish Dinners.

Chicken Pot Pie
1 cup chicken broth
1 can evaporated milk (you will use 6 oz.)
4 tablespoons butter, unsalted
2 large leeks, chopped as far up as the stalk isn't too firm (mainly the white and light green parts)
1 medium granny smith apple thinly sliced
2 cups shredded cooked chicken
1/4 cup flour
1 teaspoon rubbed sage
1/4 cup cream sherry
salt and pepper to taste
fresh parsley

Biscuit Dough
1 cup flour
3/4 teaspoon baking powder
1/4 teaspoon baking soda
1/4 teaspoon salt
1/2 cup grated sharp cheddar cheese
4 tablespoon unsalted butter, cold
1/2 cup buttermilk

Preheat oven to 400 F.  Heat chicken broth and evaporated milk for about 3 minutes in the microwave.  Heat 2 tablespoons of the butter in a large skillet over medium-high heat.  Add leaks and apples and cook until tender.  Remove from heat and set aside in a bowl with the shredded chicken.  Heat additional 2 tablespoons butter in the skillet.  Whisk in flour and sage.  Mix and then add the heated chicken broth and evaporated milk mixture.  Once the sauce thickens, turn off the heat and add the cream sherry and season with salt and pepper.  Stir this mixture and parsley into the chicken and leek mixture.  Adjust seasonings.  Pour mixture into a 9 inch pie plate.

For the biscuits mix flour, baking powder, baking soda, salt, and cheddar cheese.  Mix in cold butter until small crumbs of butter appear. (I use my fingers.)  Mix buttermilk into dry ingredients until the dough just comes together.  Place biscuit dough over the chicken mixture in the pie plate.  It is sticky so I pulled it out in small bunches.  Bake until the biscuits are golden brown and the filling is bubbling, about 30-40 minutes.  Serve hot.

Serves 4-6

Wednesday, December 4, 2013

Pork Adobo

I had heard of pork adobo before making this recipe, but I didn't really understand what it was or the flavors involved.  When I was paging through Brought, Borrowed and Stolen by Allegra McEvedy, I found this recipe based on her travels in the Philippines.  Once I saw that it contained pork belly I knew I had to give it a try since pork belly is one of the most delicious things I have been eating recently.  I fell in love with pork belly when I first tried it in Hong Kong.  I didn't realize that fat could have so much flavor and literally melt in your mouth.  That being said I became obsessed with trying it again.  It is not something to eat frequently, but it is absolutely wonderful to eat if cooked well.

This is a very rich dish so a little goes a long way.  Also, because of the high fat content of pork belly, I would ration it out because it will melt in your mouth, but also is difficult on the stomach if you aren't used to eating a lot of fat.
This recipe serves 4 easily, but again because it is rich, serve it with plain rice.  A nice green salad would help balance it out as well.
This is the most delicious pork belly.  Make sure you cut it in small enough pieces to enjoy, but not become overwhelmed.  Also, when you cook it up you want it to be crunchy.


Pork Adobo
2 tablespoons peanut oil
5 cloves of garlic, peeled and sliced
10 ounces of pork belly cut into chucks (I recommend 1/2 inch x 1/2 inch x 1 inch)
1 red onion, peeled and sliced (length shouldn't be more than 1.5 inches)
1 red pepper, cut into large bit sized pieces
1.5 inches of ginger, peeled and grated
1/2 teaspoon paprika
1/2 cup white wine vinegar
4 tablespoons light soy sauce
3 bay leaves
about 10 peppercorns
salt 

Heat the peanut oil in a large skillet over a medium high heat.  Put in half the garlic slices, make sure they are covered and remove once they are golden brown.  These will be your garnish, but also balance out the rich flavors.  Blot the garlic on a paper lined plate.

Add the pork belly to the pan and let them cook for about 10 minutes or until golden brown.  Add cut onions, pepper, ginger and the rest of the garlic slices.  Mix it all together, cover, turn down the heat and cook for about 6 more minutes, stirring once or twice, until the peppers and onions are starting to softened.  Add the paprika and mix again.  Pour in the vinegar and soy sauce and about 1 cup of water.  Also add the bay leaf, peppercorns and some salt.  Turn up the heat to bring to a boil.  Turn the heat down again so it is simmering consistently.  Cook for about 50 minutes, stirring occasionally, until the liquid has thickened.  Remove from heat and sprinkle with the fried garlic before serving.

Tuesday, December 3, 2013

Easy French Chicken

I stumbled upon this recipe while reading through cookbooks I had checked out from the library.  My husband didn't even know the library had cookbooks, let alone the number they actually do have on their shelves!  So my quest started to try to not buy very many cookbooks, but really that is a lost cause.  It became a way for me to preview a cookbook to see if I would be interested in cooking any of the recipes in the cookbook.  It does pay off as I can decide how many recipes I would like to try and decide if it really is worth buying the book.  This recipe for French Chicken comes from one such trip to the library.  This recipe I made before I even bought the cookbook.  I figured this and the other recipes in this book was well worth as easy and very tasty chicken recipe for an easy weeknight meal.  The book is called The Bonne Femme Cookbook by Wini Moranville.  I look forward to trying more of the recipes from this book.  The ingredient lists are not intimidating and the directions not extensive.  I think this book will bear more recipes which this ones shares...very good, easy and quick.


Chicken Francese (French Chicken)
2 boneless skinless chicken breasts
salt and pepper to taste
1/4 cup flour
2 tablespoons olive oil
1 tablespoon fresh parsley or chives
2 tablespoons  unsalted butter
3 cloves garlic, pressed
3/4 cup dry white wine
3 tablespoons fresh lemon juice

Pound chicken breasts between plastic wrap to about 1/4 inch thick or butterfly them.  Season both sides with salt and pepper.  Dredge chicken in flour, removing any extra.  Heat the olive oil in a large skillet over medium-high heat.  Add the chicken and cook, turning once until no longer pink inside (7-8 minutes).  Transfer chicken to a platter and sprinkle with parsley or chives.  Cover to keep warm.

Drain off any fat from the skillet.  Add 1 tablespoon of the butter to the skillet.  When melted, add the garlic and cook until fragrant (about 30 seconds).  Add the wine and lemon juice,  stir to remove any brown bits from the bottom of the pan.  Bring to a boil and boil until reduced by half (about 2-3 minutes).  Reduce heat to low and whisk in the remaining 2 tablespoons of butter, 1 tablespoon at a time to thicken the sauce.  Arrange the chicken on dinner plates and spoon the sauce over the chicken and serve.

Makes 2-4 servings, depending on the size of the chicken breasts.

Monday, December 2, 2013

Chicken Pot Pie


The finished product! Doesn't it look delicious?

One of my goals in cooking for me and my husband is to make sure I use enough vegetables.  My husband doesn't like vegetables or at least that is what he is always telling me.  So my challenge is to get him to eat vegetables in a way that he doesn't realize he is eating as much as he does.  The good part is that he is always willing to try something at least once, which makes experimenting with new recipes easier than it could be.  There are a number of recipes I can now get him to eat that don’t include meat, which at times I find too heavy.  This recipe from Ad Hoc at Home, while a little time consuming was a winner as far as including aromatic vegetables, but also in getting them to go along well with some meat.

Before the sauce is added...

This recipe is not for the faint-hearted because I have never had all four of my burners working at the same time for just one recipe.  However, it was only for a short period of time and the job was done - to get flavor into raw vegetables without overcooking them.  Also, because it was a pot pie, there is of course a part of the recipe in which you have to make dough.  I have never liked working with dough and used to avoid recipes with them at all cost.  I never bought store-made dough as I didn't want to give in to a partially homemade dish.  In the past five years though, I have not only begun working with dough, but have also mastered the basic dough recipe.  As much as I dislike rolling out dough, it likes me and without fail the crust (or cookies) turn out great.

Bechamel Sauce for the pot pie.

Chicken Pot Pie
Pie Crust:
2.5 cups flour
1 teaspoon salt
10 ounces unsalted butter, cold
About 5 tablespoons cold water

Combine flour and salt in a bowl.  Add the butter and use your hands to mix into pea-sized lumps.  Add the 5 tablespoons water until it forms a ball.  Add more as needed for the flour mixture to come together.  Divide dough into two (one should be slightly smaller as the top will need less than the bottom crust).  Refrigerate for about an hour.  Roll out dough into a round about 13-14 inch bottom for a 9 inch pie plate.  Add flour as needed, but don't incorporate too much.  Put the first piece into the bottom of the pie plate and roll out the second for the top.  Refrigerate while ingredients are cooking.

Filling:
1 cup red potatoes cut into 1/2 inch pieces
1 cup carrots cut into 1/2 pieces
1 small onion cut into 1/2 pieces
3 bay leaves
3 thyme springs
24 peppercorns (black preferably)
1 cup celery cut into 1/2 pieces
2 cups shredded cooked chicken

Sauce:
3 tablespoons unsalted butter
3 tablespoons flour
3 cups milk
1 teaspoon salt
1/2 teaspoon freshly ground black pepper
1 tablespoon parsley
1/2 teaspoon chopped thyme
pinch of cayenne pepper

Glaze:
1 egg, beaten

Put the potatoes, carrots, and onions in separate small saucepans with water to cover and 1 bay leaf, 1 sprig of thyme, and 8 peppercorns for each pan.  Simmer for 8-10 minutes until just tender (med-high heat).  Drain vegetables, discard thyme, bay leaves and peppercorns.  Spread the vegetables on a baking sheet.  Bring a large pot of salted water to a boil.  Fill a medium bowl with ice and cold water.  Blanch the celery until just tender, but still crisp (about 1 minute).  Drain and transfer to the ice water bath.  Drain and add to the baking sheet.

Melt the butter in a medium saucepan over medium heat.  Whisk in flour and cook for 2-3 minutes.  Whisk in milk and lower the heat to keep the sauce at a gentle simmer.  Whisk often until the sauce has reduced and thicken to about 2 cups (about 35 minutes).  Don't let the sauce burn.

Preheat oven to 375 F.  Strain sauce through a fine mesh colander.  Season with salt, pepper, parsley, thyme and cayenne pepper.  Remove the rolled dough from the refrigerator.  Scatter the vegetables and chicken into the pie plate with the crust.  Pour the sauce over them.  Moisten rim of dough with the beaten egg.  Place the top crust onto the pie plate filled with chicken and vegetables.  Press the edges to seal the dough.  Remove any extra dough from edges.  Brush the top of the dough with the beaten egg.  Cut a small vent in the top of the dough to let steam escape.

Bake on the lower oven rack until the crust is golden brown about 55 minutes.  Remove from oven and let rest for 10 minutes.  Cut into wedges and serve.  Serves about 6.


Apple Pancakes


I have a hard time going out for breakfast.  Many might ask why, but the answer is simple.  I like to stay at home and eat good food.  Breakfast is one of those meals which is very easy to make as long as you keep certain staples on hand.  My staples include buttermilk, flour, sugar, brown sugar, maple syrup, butter, and eggs.  If you have these things there are endless things you can make with them.  This one I found in the Penzey's magazine. Penzey's, for those of you who are unfamiliar with them, is a wonderful spice shop.  They used to be walking distance from my apartment in St. Paul.  I used to go there to buy even just one spice if I ran out because it just smelled so good.  Once I moved to Colorado and they appeared in my city, I was happy to go there.  Plus, they kept giving out spices when I would get their catalog, so how could I say no to be able to try even more good things?


This pancake recipe is in their most recent catalog catalog.  It is called German pancakes, but in a way I disagree with the name as I didn't see a pancake such as this when I lived in Germany.  However, this does remind me of the Scandinavian pancakes which puff.  I don't really like baked or cooked apples and this pancake is one which they don't bother me.  Extra bonus it is really easy to make.  The longest part was cutting the apple to put in the pancake.

Apple Pancakes
2 eggs
3/8 cup flour
1/4 teaspoon salt
1/2 cup milk
2 tablespoons vanilla sugar
1/2 teaspoon cinnamon
2 tablespoon butter
1 medium granny smith apple, thinly sliced

Preheat oven to 400F while you prepare the pancake.  Place a 9 inch pie plate into the oven to heat.  Beat eggs, flour, milk and salt.  Remove the pie plate from the oven and place 1 tablespoon of butter into it to melt.  Spread apple slices into the bottom of the pie plate.  Pour in the batter.  Sprinkle with cinnamon and sugar.  Bake at 400F for 20-25 minutes until the pancake is golden brown and puffy.  Serve immediately.

Serves two, but can be doubled if more if desired.

Sunday, December 1, 2013

Gooey Cinnamon Breakfast Biscuit


When I was young my grandma would bake every Saturday.  Fortunately, since I live just up the block, I was able to "help" her bake often.  She would bake beautiful dinner rolls and these wonderful beautiful tasting cinnamon rolls.  While I love those rolls, I don't always want to start my morning with the whole process in order to several hours later eat those wonderful rolls.  So when I saw this recipe which is very quick to throw together because of the nature of the biscuit dough instead of the traditional bread dough, I thought I had to try it.  Plus, as there are only four of them it is just the right size for my husband and I to eat and not watch the rest of them go stale.


Gooey Cinnamon Biscuits
2 cups flour
1 tablespoon brown sugar
1 1/2 teaspoon baking powder
1/2 teaspoon salt
2 cups heaving whipping cream
2 tablespoons cinnamon
3/4 cup powdered sugar
1 teaspoon vanilla

Heat oven to 425 F.  Grease and line with parchment paper and 8 inch by 8 inch pan.  Whisk flour, sugar, baking powder and salt.  Pour 1 1/2 cups of the whipping cream into the dry mixture and mix until just combined.  Turn out dough onto a lightly floured surface.  Pat into a rectangle.  Slice into 8 squares and lay half of them into the prepared pan.  Sprinkle cinnamon over the squares (add a little sugar if desired but really more sugar is not needed).  Cover each square with a second square and press together to seal.  Top with additional cinnamon (or cinnamon and sugar mixture).  Bake for about 15 minutes until golden brown.  Whisk together remaining 1/2 cup cream, powdered sugar and vanilla. Drizzle with glaze once biscuits have been removed from the oven.  Serves about 4.