Sunday, August 18, 2013

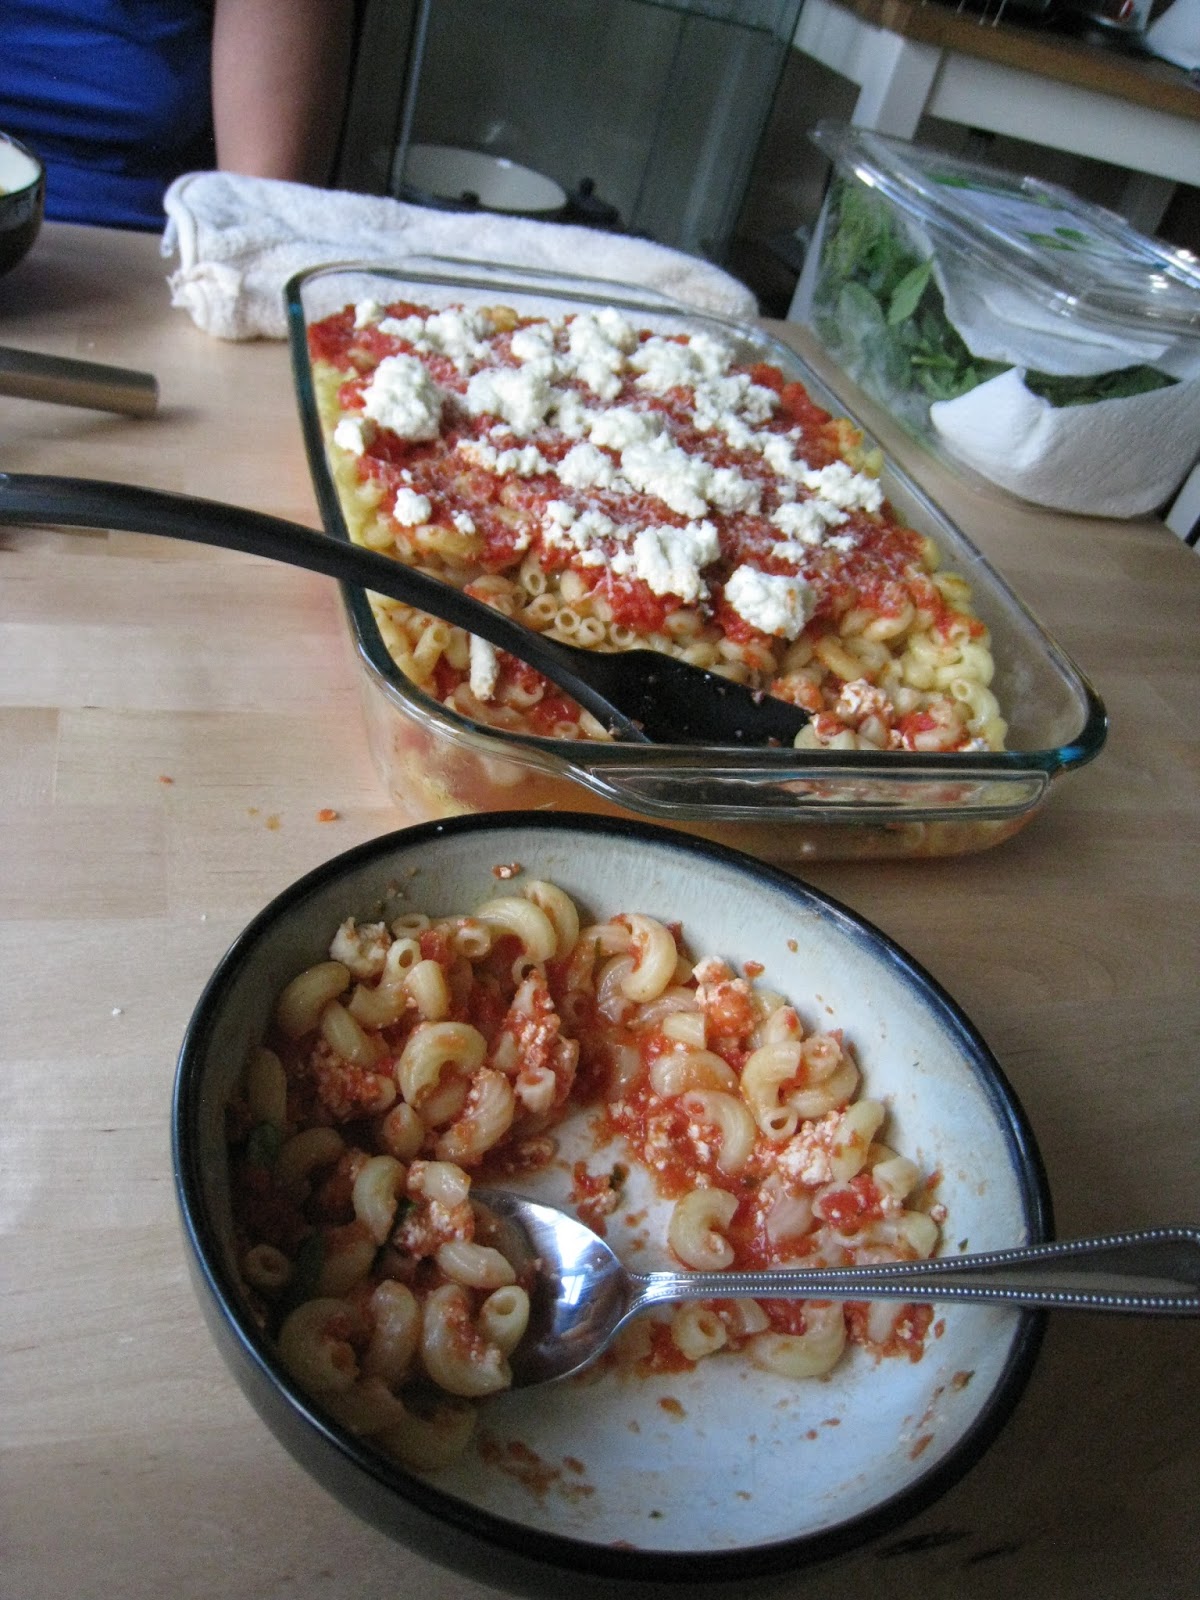
Timballo Pasta with Fresh Ricotta

Timballo Pasta with fresh Ricotta


Like the chilaquiles, this recipe is based off of heart of the artichoke by David Tanis.  I was intrigued by the pasta bake and started to read about it.  Then I discovered even the tomato sauce was homemade for this recipe.  I took it one step further and made my own ricotta cheese as well as it is quick to make and tastes so good when made at home.  Plus, it is much cheaper than buying a pound of ricotta which has been in the store for who knows how long.  This dish also reheats very well, so leftovers are great for lunch the next day.  It does make a lot given that it is based on a pound of pasta.  I used elbows, but the original recipe states anelli which are rings, but I could not find them.  Once you have the sauce and the ricotta, this dish is quick to assemble and bake, so makes a good weeknight meal also.

Timballo Pasta with fresh Ricotta

1 pound pasta
olive oil
salt and pepper
red pepper flakes
4 cups tomato sauce
1 pound fresh ricotta, room temperature
pecorino, grated
basil leaves, chopped

Preheat the oven to 350F.  Bring a pot of salted water to a boil, and boil your pasta for 12 minutes or as needed to reach al dente.  Drain and put in a large bowl.  Add some olive oil and season with sea salt, freshly ground black pepper, and red pepper flakes.  Heat the tomato sauce.  In a large oven-proof cake pan, spoon half the tomato sauce and half the ricotta.  Pour in all the pasta.  Then pour the rest of the tomato sauce and ricotta on top of the pasta.  Sprinkle with the grated pecorino.  Heat in the oven for 10-15 minutes, until hot all the way through.  Remove from oven and sprinkle with more pecorino and fresh chopped basil.


Tomato Sauce
1/8 cup olive oil
1 small onion, diced
4 cloves garlic, finely chopped
salt and pepper
4 pounds ripe tomatoes (peeled, seeded, and chopped)
basil (a spring or small hand full of leaves)


Heat the oil in a heavy pot.  Saute the onion until soft, about 10 minutes.  Add garlic, salt, pepper and cook for about a minute.  Add the tomatoes and basil and let the sauce come to a boil for about 5 minutes.  Reduce heat and cook for 75 - 90 miuntes.  The sauce will be done when it is not too thin, nor too thick.  Remove from heat.  Puree with a hand blender until appropriate smoothness.  This sauce is able to be frozen for later use.  (Makes about 4 cups)

Friday, August 16, 2013

Chilaquiles

Chilaquiles

Six months ago if you had asked me what chilaquiles were, I would have given you a blank stare.  Sometime this spring I was talking to someone, they mentioned chilaquiles.  Since I love many different types of food, but Mexican food in particular, I was interested.  There are many different ways to make chilaquiles, so this will be just one version of what you could come up with depending on what you want to add to this breakfast dish.

This version is a twist from heart of the artichoke by David Tanis.  Ironically, I have owned this book for a little more than a year, but I don't recall reading about the chilaquiles.  At any rate when I unpacked some of my stored cookbooks, I was happy to come across this book for inspiration.  I find David Tanis' voice an interesting read.  Not only are the recipes well thought out, but they are more on the simplistic side of things.  This does not mean they are not time consuming, but taken in steps the dishes are easy to put together and have a wonderful cacophony of flavors.

This version of chilaquiles is quick to prepare, but remember to have your mise en place completed before starting or you will be scrambling since it cooks quickly.

Chilaquiles
Serves 1

Corn tortillas
olive oil
cilantro or parsley
scallions
chiles
salsa
1 egg beaten
salt
pepper


Cut two tortillas into smaller pieces.  Heat a skillet with a little olive oil and fry the tortillas until crisp.  Add the chopped parsley or cilantro, scallions, chiles and salsa.  Add the beaten egg.  Add salt and pepper to taste.  You are ready to eat as soon as the egg is cooked to your liking.  This is very aromatic and will make you eager to dig in!  Note: if you double the recipe, be sure that your tortillas are crisp and the eggs don't make them soggy.

Celery Salad

This is another recipe I found when I was reading through Cook This Now by Melissa Clark.

I have always made a celery based stuffing for my turkeys.  I seems to use one or two stalks and then I have so much left over.  Fortunately, my grocery store frequently sells by the stalk, but I don't like to buy them often as they are frequently starting to wilt and I like to get the most fresh ingredients which means I can't buy just a stalk.  At the same time, I don't want to waste any food I buy and like to use as much of the item as I can.  If you have heard of the farm to table movement, they frequently use as much as possible of each item as well.  It is a good idea and if you are a more adventurous cook, you can make some really cool items from the leaf tops of beets or turnips or many vegetables.

At any rate this is a quick salad to put together.  Really the only two things that take time and relatively little of that are the roasting of the walnuts and the chopping of the celery.  This salad also convinced me to reintroduce walnuts into my cooking (though I am still not sold on them in baked goods).  You can also roast the walnuts on the stove top if you don't want to turn on the oven (though you might need more than one batch since you want the single layer).  You can also up the portions if you have more celery or more people.


Celery Salad

About 1.5 cups walnuts
2 Tablespoons red wine vinegar
1/2- 3/4 teaspoon salt (try a flaky one for bigger chunks of flavor)
Black pepper to taste (I like a lot, but taste it and see how much you would like)
1/2 cup good quality olive oil
12 celery stalks, chopped finely (leaves and all)
Parmesan cheese to taste  (Good Quality - from a large round)

Toast the walnuts in a 350 F oven for about 10 minutes, tossing in the middle.  Toast lightly until golden or aromatic.  Then chop into smaller pieces (or sometimes I break them into smaller pieces).  Whisk together the red wine vinegar, salt, pepper, and olive oil.  Combine the nuts, cheese and celery.  Toss with olive oil and red wine vinegar mixture.  Serves 6.

Sunday, February 24, 2013

Tortellini Salad

I am always trying to find more ways to get my husband to eat more vegetables.  It isn't that he doesn't like them, but it is easier to eat crackers or just a hamburger without any sides than to go to the troubles of adding vegetables to the mix.  I was reading through super natural every day by Heidi Swanson.  (Her 101cookbooks blog is excellent.)  I tried to pick out a couple of recipes which I could try out and even have my husband request again.  This recipe for Tortellini Salad was one of the recipes I made, and which he requested to eat again.  Fortunately, both broccoli and asparagus were fresh in the grocery store and so I happily got both.  I had been thinking about what to do with them both when I read this recipe again which contained both of the chosen ingredients.


This is a super simple recipe to prepare, and particularly when I am being a little lazy or don't have much time during the week.  I even went through some of the steps with my husband as I am always trying to find recipes which he will take up cooking so I can continue to experiment with more.

Tortellini Salad: adapted from super natural every day
about 16 oz fresh tortellini filled with cheese
12 thin asparagus spears (cut into 1.5-2 inch pieces)
1 small crown of broccoli (more if you really like broccoli)
1-2 garlic cloves
2 tablespoon lemon juice (fresh squeezed is best)
1/4 cup good quality olive oil
fresh parsley (equivalent to about 1/4-1/2 cup finely chopped)
1/3 cup pine nuts - roasted
1 medium avocado

Method:
Bring a pot of salted water to boil and cook tortellini according to package directions.  About a minute before the tortellini is done, add the broccoli and asparagus to quick cook them.  Drain everything and place under cold water to stop the cooking.  Make the dressing: press the garlic and mix with a little salt,  add lemon juice and olive oil.  Whisk together.

When ready to serve, toss the tortellini, broccoli, asparagus, and parsley with the dressing.  Add the pine nuts and avocado.  Toss gently to mix ingredients.

Serves: about 4

Certified International Sienna 5-Pc. Pasta Bowl Set (Google Affiliate Ad)Certified International Sienna 5-Pc. Pasta Bowl Set (Google Affiliate Ad)

Pear Pastry Cream Tart

I came across a bunch of pears which weren't going to be eaten.  It is my nature to use up everything and let as little go to waste as I can.  When I came into these Comice pears which were starting to die a slow rotting death, I had to take them and turn them into something wonderful.  I couldn't find a recipe which I wanted to make.  I read through cookbooks and decided to piece meal them into something else...a pear pastry cream tart.  I made a basic tart crust and baked it.  Then I made a creamy pastry cream to coat the beautifully baked crust.  Then, I topped it with lovely slices of pears to cover the pastry cream.  Finally, I added a light glaze as a final touch.


Short Crust Pastry:
1 cup flour
1 tablespoon sugar
1/4 teaspoon salt
1/2 cup unsalted butter
1 tablespoon butter
1 tablespoon water
1/2 teaspoon vanilla extract

Mix the flour, sugar and salt.  Cut the butter into 1/2 inch slices and work into the flour until the pieces are small and it is beginning to hold together.  Combine water and vanilla and work it into the flour mixture.  Put it into a ball and refrigerate.  Let rest for 30 minutes.  Press into a 9 inch tart pan.  Place the shell into the freezer for 30 minutes prior to baking (wrapped in foil).  Preheat oven to 375 F.  Bake for 25 minutes or until light brown and baked through.


Pastry Cream:
2 cups milk
1/3 cup flour
6 tablespoons vanilla sugar
6 egg yolks
1 tablespoon unsalted butter

Heat milk to just under boiling.  Mix the flour and sugar in a heat saucepan.  Beat egg yolks until thick and light colored.  Whisk the hot milk until the flour and sugar mixture and cook over medium heat until the mixture has boiled for 1-2 minutes, stirring continuously.

Whisk a little of the mixture into the eggs to heat them a little and stir into the flour mixture.  Mix well and cook over medium heat until the pastry begins to hold shape, stirring continuously.   The temperature should reach 170 F.  Do not let it boil.  Remove from heat and stir in butter.  Strain through a fine strainer.  Cool and whisk occasionally to keep a crust from forming or cover with plastic and refrigerate until cool.  Whisk before pouring into the baked shell to smooth, but do not over whisk or it will thin out. 


Poached Pears:
3/4 cup sugar
2 1/4 cups water
2 inch piece of vanilla bean
1 1/2 pound pears
2 tablespoon apricot jam

Bring the sugar, water and vanilla bean to a boil in a sauce pan.  Quarter, core and peel the pears and add them to the hot syrup.  Cover and simmer for 15 minutes or until pears are cooked through.  Remove from syrup and place on a plate to chill them..

To assemble:  Spread the pastry cream in the bottom of the baked shell.  Drain the pears and cut into 1/4 inch slices.  Beginning from the outside place the pears in a circle, over lapping the edges. Continue until the pears cover the pastry cream.  Heat the jam until it bubbles and brush lightly over the pears.


Saturday, February 23, 2013

Chinese - Kung Pao Chicken


Kung Pao Chicken
 
I am not a big fan of Chinese food...well not the traditional American Chinese take-away which seems to take 30 seconds to make and doesn't capture the flavors which you can experience in Hong Kong (as Hong Kong food is closer than other traditional Chinese flavors to American Chinese take-away).  However, my husband is a BIG fan of Chinese food and would eat it every week.  So the compromise was for me to find some traditional Chinese food which I could make at home relatively easily and which we would both like to eat.

I found both of these things in Easy Chinese Recipes by Bee Yinn Low.  This recipe for Kung Pao Chicken is adapted from the recipe in this book, which also contains wonderful recipes for dim sum of which I need to try out.  If you have never eaten dim sum, I encourage you to try it out for a brunch some Saturday or Sunday morning as it is quick and delicious bite sized food in a variety of flavors.

Kung Pao Chicken comes from the Sichuan area of China.  It is known for food which is spicy which can be tempered by rice if you so desire.  I didn't eat Kung Pao Chicken when I was in China, but I had some other Sichuan food which was spicy and filling.  This recipe serves two with only 8oz of chicken.  I like to double the chicken as it is so tender I don't want to stop eating it.  However, this does not reheat very well as the peanuts become chewy and the onions wilted.  Note: I use an electric wok to cook with as the temperature is much higher than using the stove regardless of whether it is electric or gas.  The wok heats up quickly and efficiently and everything cooks much better than on the stove top.

Kung Pao Chicken
16 oz. Chicken, boneless chicken breast cut into bite sized pieces
2 teaspoons sherry
3 tablespoons cornstarch (really I make sure that the chicken has been covered lightly)
4 tablespoons peanut oil
2 tablespoons sichuan peppercorn oil (made from soaking sichuan peppercorns in oil)
2 cloves garlic, peeled and sliced thin
About 2 inches of ginger, peeled and sliced thin
30 dried chiles
peanuts (raw or slightly baked to make more crunchy)
2-3 green onions, cut into 1-2 inch pieces

Sauce:
3 tablespoons soy sauce
1 teaspoon dark soy sauce
2 teaspoons Chinese black vinegar
1 teaspoon sugar
pepper (white is better, but I use black when I don't have white on hand)
4 tablespoons water
2 teaspoons cornstarch

Method:
(Be sure you have put the rice on before beginning to stir fry the chicken.)  Tenderize chicken before beginning, if you desire.  Marinate the chicken with sherry (or rice wine) and cornstarch for about 10 minutes.  Mix all the ingredients for the sauce and set aside.  Heat 1 tablespoon of peanut oil in a wok and stir fry the chicken until they are half-cooked.  Remove from wok and set aside.  Heat remaining peanut oil and peppercorn oil.  Add garlic and ginger, stirring quickly.  Add the chiles until you smell the spicy aroma of the chile peppers (don't breathe in too much!)  Return chicken to the wok and stir with spatula.  Add the sauce and stir until chicken is well coated.  Stir in peanuts and green onions until everything is well combined.  Serve immediately with rice.  Serves 2-4 large portions.


Breville Hot Wok, BEW600XL - stainless (Google Affiliate Ad)

Oranges with Red Chile

Oranges with Red Chile

I have been neglecting my more consistent posting since I started my new job last year.  With a 75 mile one way commute, all of my time has now been taken up by spending much more time than I was used to in my car.  Fortunately, I am up on the news, have "read" to many new books on tape, and renewed my interest in listening to new and old musicians and bands alike.  What has suffered though is my time to enjoy my cooking.  However, I have made some more simplistic things including this delicious, yet simple oranges with red chile.

This recipe is adapted from Cook This Now by Melissa Clark.  This is an easy preparation using a variety of oranges is best, but I only had on had navel oranges.  I do love blood oranges, but at the time I couldn't find any.  They have a delicious sweet, yet tartness to them which would have complimented the flavors well.  Since oranges are still in season, I encourage you to try your hand at this variation to eating plain, sweet oranges.


Oranges with Red Chile
2-3 large oranges (I used navel, but blood orange or a combination would be excecellent)
Extra-virgin olive oil
Flaky salt
Chile powder (I used Aleppo pepper)
Fresh herbs (which I did not have on hand so didn't use)

Method:
Cut off peal of the oranges.  If you cut top and bottom off first, you can stand the orange on end and slice off the peel from the sides and create the geometric shape you see here.  You want all the pith to be removed from the outside of the orange.  Slice into about 1/4 inch slices.

Spread orange slices onto a plate, and then drizzle them with olive oil (make sure it is of good quality).  Sprinkle with flaky salt.  (I used a flaky sea salt.)  Dust with chile powder and serve.


Kyocera 2-Piece Asian Ceramic Knife Set, Black (Google Affiliate Ad)