Wednesday, September 28, 2011

Norwegian Baked Cheese Omelette

I have visited Norway a few times and each time I have been met with delicious food and hospitable people.  I never did eat this omelette there, but I can imagine eating it in one of the cafe's my friend took me to during my stays with her.  I have long dream of a cafe of those ranks in the U.S.  It was set on the shore of one of the waterways which lead to Oslo.  Just out of the distance on the water, you can just imagine Oslo there.  From this town as well you can take a ferry into Oslo, which we did take once.  The view in the morning from the cafe is crisp and clean in October, but on that weekend day, the cafe was filled with friends and family who were enjoying each others company while eating a sandwich or a pastry with coffee.  This omelette recipe also comes from Scandinavian Feasts by Beatrice Ojakangas.  Try it out and share with friends and family as I did when I served it...Hot from the oven with bread, juice and friends.


Norwegian Baked Cheese Omelette

4 eggs
¼ cup milk
½ teaspoon salt
2 tablespoon unsalted butter
4 whole green onions, sliced
1 cup cooked diced ham
1 red bell pepper, seeded and chopped thinly
8 ounces Jarlsberg cheese, cut into ¼ inch cubes

Preheat oven to 400F.  Whisk together eggs, milk and salt.  In a frying pan, melt the butter.  Add the ham, onion, and bell pepper and sauté over medium heat for 3-4 minutes, until the onions are bright green and the pepper is hot.  Pour the egg mixture over the sauté and sprinkle with the cheese cubes.  Bake for about 20 minutes until the egg mixture is set and cheese is melted.

Makes 4 servings

Danish Rye Butter Buns

When I was young, my family lived on the same street as my grandparents.  I loved to go to my grandma's on Saturday morning when she was in the kitchen baking.  The kitchen always smelled so good!  I was able to sit at the kitchen table and play cards with my great-grandma while my grandma baked away.  When I got a little older, my grandma let me bake with her.  One the the things that I learned from my grandma was how to cut bread.  She let me make a small version of whatever she was making.  One day we were baking cinnamon rolls.  I remember her large pan ready for rising while she showed me how to cut my small roll into individual rolls.  She gave me a piece of string and watched me pull it through the bread for a gentle, but effective cut.

As I grew older, I tried to make bread several times and it never quite turned out for me, so I quit making bread from scratch.  It always bothered me because friends and family who know me, know I like to bake and cook everything I can from scratch.  I wasn't going to let yeast things scare me anymore and started this year with artesian bread which turn out wonderful, delicious and not difficult to make at all.  These rolls also come from Beatrice Ojakangas' book Scandinavian Feast.  The name is right on as there are 5 sticks of butter used in this recipe, but it will be difficult to actually stop eating these rolls.


Danish Rye Butter Buns

2 packages active dry yeast
½ cup warm water (about 110F)
1 cup warm milk (About 110F)
2 tablespoons sugar
1 teaspoon salt
2 eggs
1 stick butter, melted
2 cups rye flour
4 cups white flour
3 sticks cold butter
1 stick butter, softened

In a medium bowl, dissolve the yeast in water.  Add the milk, sugar, and salt and let stand for about 5 minutes or until the yeast foams.  Beat in the eggs, melted butter and 1 cup of the rye flour.  Measure the remaining rye and white flour in a large bowl.  Cut the cold butter into the flour mixture.  Pour the yeast mixture over the flour mixture.  Carefully fold the two mixtures together until just moistened.  Cover the bowl and refrigerate for at minimum 4 hour and up to 2 days.

When ready to shape the dough, turn it out onto a lightly floured board.  Knead gently to get rid of any air bubbles.  Divide the dough into four parts.  Roll the dough out to make a 15 inch circle.  With a butter knife, spread the surface of the circle with 1 tablespoon of the soft butter.  Fold the circle into thirds and roll it out into a 24 inch square.  Fold into thirds again to make a square about 15-16 inches wide.  Spread the surface with another tablespoon of the softened butter.  Roll up the dough (Jelly-roll style).  Cut into 8 pieces and place seam side down onto a baking sheet to rise.  Repeat with remaining three pieces of dough.  Let rise in a warm place until doubled in size (about 2 hours).  Preheat oven to 400F.  Brush the buns with a beaten egg and sprinkle with a coarse salt.  Bake for about 15 minutes or until golden and crusty.  Remove from oven and cool on racks.  Serve warm or cooled.
Makes 32 buns


Vanilla Cream Sauce

Every since my trip to Finland this summer I have become obsessed with Scandinavian food.  I have been reading several Scandinavian cookbooks, including Scandinavian Feasts by Beatrice Ojakangas.  It is soon going to be part of my cookbook collection/obsession.  The first recipe I tried from this cookbook was a simple berry recipe for a vanilla cream sauce.  It is like a delicious vanilla pudding, but not so sweet so it compliments fruits very well.  If only I had discovered this earlier in the year when my raspberries were coming in, but fortunately there are still great tasting berries available in the grocery stores in addition to my strawberries which have no desire to stop blooming and growing.


Vanilla Cream Sauce

1 egg, beaten
2 tablespoons vanilla sugar
2tablespoons corn starch
3 cups skim milk
2 teaspoons vanilla extract

In a saucepan, heat the beaten egg, vanilla sugar, cornstarch and milk together over low heat.  Stir constantly until it is simmering.  Simmer 2-3 minutes, until thickened.  Remove from heat and cool.  Stir in vanilla extract.  Cover and chill.  Serve with berries.  Makes about 8 servings.

Sunday, September 11, 2011

Soba Noodles


Sometimes I just buy a cookbook because someone told me it was a good one to buy.  Sometimes I get them from the library to be sure I would like to cook from it before I actually buy it.  I don't think I would regret buying one even if I never cooked from it, but in the past few months I have been trying to cook my way through the books I have not cooked from, which is why you have seen more of a variety of different recipes.  I like to read cookbooks for fun, but some like Yotam Ottolenghi's Plenty makes me feel like I am eating my way through the cookbook.  This recipe for Soba Noodles is based on his in Plenty, but oh how I would love to eat in his restaurant to taste the food from this marvelous cook.

This dish is refreshing to eat when it is hot outside as the cucumber just adds that coolness to the food that doesn't make you feel too full when you eat it.  Besides, it just looks great to eat!


Soba Noodles
2 large cucumbers
2 teaspoons salt
300 g soba noodles
70 grams toasted sesame seeds
30 g coriander leaves, chopped
25 grams mint leaves, chopped
50 g sprouts

Sauce
2 tablespoons rice vinegar
Zest of a lime
60 mL lime juice
1 tablespoon grated ginger root
2 green chilies, chopped
1 tablespoon sugar
2 tablespoons toasted sesame oil
1 tablespoon sweet chili sauce
1 garlic clove, pressed
¾ teaspoon salt

Shred the cucumber with a grater, then add them to a collander.  Sprinkle with the salt and stir well.  Let them drain for about 30 minutes.  Put the noodles in a pot of boiling water and cook as directions say.  Drain and rinse in cold water to stop the cooking.  Let them sit aside and dry.

Add the cucumbers to the soba noodles.  Whisk all of the sauce ingredients together and add to the noodles and cucumbers.  Stir gently.  Add the sesame seeds, coriander, mint and sprouts.  Stir and taste.  Add more salt, vinegar or sugar if needed to get a sweet tart flavor.  Serve in bowls and garnish with sprouts.

Tuesday, August 30, 2011

Paella

Paella has long since been one of my favorite Spanish dishes, but I never thought I would be able to cook something that would even come close to what I ate in Spain at my host mom's table.  She would pull out this huge frying type pan which would cover the entire stove (all four burners)!  She would start adding each ingredient until the smell was unbearable and I couldn't wait to taste it.  With a pan that size she fed the entire family (about 10-12 people) and there was plenty to keep us all full and happy with such delicious food.

This recipe comes from Pam Anderson's cookbook Perfect One-Dish Dinners.  I would highly recommend you to buy it and try out this recipe as well as many others which are just as great and easy to cook up for dinner.

Paella


Serves 4-6

1 pound boneless, skinless chicken, cut into pieces
Oil for cooking
1 teaspoon paprika
1 teaspoon oregano
Salt and pepper
½ pound spicy sausage
1 yellow onion
½ bell pepper, chopped
3 cloves garlic
1 cup short grain rice
Saffron
½ teaspoon red pepper flakes
3-4 cups chicken broth
1 can diced tomatoes
½ pound deveined shrimp
½ cup peas
Parsley

Drizzle chicken with 1 tablespoon oil, sprinkle with paprika, oregano, salt and pepper.  Toss to coat evenly.  Heat a large skillet over medium heat.  When pan is hot, add chicken and cook until brown and just cooked.  Transfer to a small bowl.

Add remaining 1 tablespoon oil to the pan and add sausages.  Cook until well browned.  Add onion, bell pepper, garlic and cook until tender.  Stir in saffron, pepper flakes and rice.

Add broth and tomatoes and continue cooking over medium-high heat until liquid simmers.  Reduce heat to low, cover and cook until most of the liquid is absorbed, about 15 minutes.  Stir in chicken and shrimp and their juices.  Add peas, parsley and cook until seafood is cooked through, about 5 minutes longer.  Turn off heat and let stand for a few minutes.


Monday, August 29, 2011

Norwegian Fattigman - Fried Dough

Fattigman is a Norwegian delight.  It literally means poor man's cakes and traditionally they were fried up for Christmas.  Additionally, you can buy a cutter for the dough specifically for this recipe, but it also works well enough to cut diamond shapes and fold the dough through the slit.  This recipe is very simple and comes from the Scandinavian Baking cookbook by Pat Sinclair.
Fried food is always so bad for you, but oh so good when you eat it fresh from the oil.  They are also so pretty when cooked to a nice golden color and then dusted with powdered sugar.  Just be sure you allow enough time for the dough to chill before frying, but this recipe doesn't take much time to put together other than chilling time.


Fattigman:
Makes about 3 dozen cookies
3 large eggs
3/4 cup sugar
1/4 cup heavy whipping cream
1/4 cup butter, melted
1 1/2 teaspoons vanilla
3 1/2 cups flour
1/4 teaspoon salt

Place the eggs in a bowl and beat until foamy.  Gradually add the sugar and continue beating on low.  Once the sugar is incorporated, beat on a higher speed until thicker and yellow.  Add whipping cream, melted butter and vanilla and beat on low.  Add the flour and salt slowly and stir until a dough is formed.  Wrap and chill for at least two hours, but overnight is fine.

When ready to cook, heat oil to 375 F.  Roll out half the dough on a floured surface to about 3/8 inch thick.  Cut into inch strips.  Cut into diamond shapes about 2 1/2 inches across.  Cut a 1 inch slit in the middle and pull the dough through.  Fry in hot oil until golden brown.  Drain on a paper towel and dust with powdered sugar.  And if you are like me be careful to wait until they are not too hot to burn your tongue!


Saturday, August 27, 2011

Rhubarb Pie

Rhubarb!

Two years ago my mom came for a visit and decided that I could not live without rhubarb.  While I was glad to have a fruit which would come back each year and sad that my raspberry bush had died that year as well, I wasn’t all together sure what I would do with rhubarb, let alone two rhubarb plants.  Well now, two years later, the rhubarb is doing great, I have found a lot of recipes using rhubarb and I have added a different variety to my raised rhubarb bed.  All is going well in rhubarb land.

Flaky Piecrust (for one crust, double for a top)
1 cup plus 2 tablespoons flour
½ teaspoon salt
1 teaspoon sugar
8 Tablespoons cold unsalted butter
3 Tablespons water

Combine all, but water.  Gradually add water until dough comes together.  Divide dough in half and roll out half.  Place into pie plate and then roll out the top.

Filling:
5 cups rhubarb, cut into 1 inch pieces
1 cup sugar
2 tablespoons corn starch
Pinch salt
2 tablespoons butter, cut into pieces

Heat oven to 450F.   Toss rhubarb with sugar, corn starch and salt.  Pour into prepared crust and dot with butter.  Cover pie and brush with milk, then dust with sugar. Make two or three slits for steam to be released.  Bake for 10 minutes at 450 F, then reduce heat to 350 for 45 – 50 minutes.
 

Sunday, August 21, 2011

Pan Bagnat (Wet Bread)


Pan Bagnat literally means wet bread.  The wet bread is not soggy bread that has been sitting around, but wet bread which has soaked up the flavors of the sandwich stuffing.  When I saw the sandwiches in Chocolate and Zucchini by Clotilde Dusoulier, I knew they were destined to come into my kitchen and be made.  Today I ventured forth and made this one.  Since it has to sit in a cool place for a couple of hours to gather flavor, I made these sandwiches just after breakfast.  I was dreaming of eating this sandwich yesterday as I wandered through the grocery store selecting each stuffing for the sandwich.  The end product is also a beautiful mesh of different colors culminating in a scrumptious lunch.


Even if you are not a sandwich person, I would highly recommend to try this sandwich out.  Not only is it easy to assemble, but it is quick to do as well.  If each of us had one of these in our lunch box, we would all eat a healthy, tasty lunch.

 
Pan Bagnat from Chocolate and Zucchini by Clotilde Dusoulier
Focaccia Bread (2 small rounds or 1 large round)
Extra virgin olive oil
2 medium tomatoes
Garlic
Salt and pepper
Red wine vinegar
Green onions
Kalamata Olives
1 can tuna packed in olive oil, drained well
Basil
Spring greens

Slice the bread in half to start building the sandwiches.  Drizzle a little bit of olive oil on each half.  Cut the tomatoes into thin slices and place on the bottom portion of the focaccia bread.  Press garlic on top of the tomatoes and then sprinkle with salt and pepper.  Also drip a little red wine vinegar on top.  Add the green onions, olives, tuna and basil.  Place spring greens on top.  Cover with the top of the bread and wrap tightly in plastic.  Refrigerate from 2 to 12 hour until just before eating as you would like the sandwich to be room temperature before eating.


Strawberry Cream Cake

I was once invited to a Norwegian's woman's home because a Norwegian friend of mine was in town.  This woman simply insisted that we come over so we could chat.  Plus, she said that she made this wonderful strawberry cream cake that we just had to try.  So the day arrived and we went for a visit.  It was one of the most delicious cakes I have eaten...keep in mind I don't really care for cakes as they tend to be drier than most other desserts or sweets I like to eat.  While this recipe is not the same, it too focuses more on not being a cake, but strawberry wonderfulness.  This particular recipe come from Scandinavian Baking by Pat Sinclair and as usual it is not quite the same as written, but particularly closer than other recipes.  How can one change something so wonderful?

Often this cake is made at the beginning of the strawberry season, but here the strawberries are still coming and they are still quite sweet.  I did not add extra sugar to bring out the flavors of the berries as they were sweet and juicy enough as they were.  I bet this cake is even better in Norway where the wonderful strawberries grow so sweet due to the amount of sunlight they get as they grow.


Strawberry Cream Cake
From Scandinavian Classic Baking by Pat Sinclair
Makes 10 to 12 servings
Cake:
¾ cup cake flour
¾ cup + 1 tablespoon sugar
4 large eggs, room temperature
¼ teaspoon salt
¼ teaspoon cream of tartar
1 tablespoon water
1 teaspoon vanilla

Topping:
3 cups chopped strawberries, cut into ½ inch pieces
1 tablespoon sugar
4 oz. cream cheese softened
1 ½ cup confectioners’ sugar
1 teaspoon vanilla
1 ½ cups heavy whipping cream

Heat oven to 350F.  Line two 9 inch pans with parchment paper.  Spray parchment paper with nonstick cooking spray.  Sift flour and 1 tablespoon sugar.

Place eggs, ¾ cup sugar, salt, cream of tartar, water and vanilla into a large mixing bowl.  Beat on high with whisk until thick and lemon colored, about 5 minutes.  The eggs should fall in a thick ribbon after 5 minutes which dissolves when it hits the batter.  Fold in the cake flour and mix until blended.  Pour into prepared pans and spread evenly.  Bakes 13 to 16 minutes or until the center springs back when touched lightly with a finger.

Cool 10 minutes on a wire rack.  Run a spatula around the edge of the pans to release the cake.  Remove cakes from pan and peel parchment from them.  Let them cool completely on the wire rack.

Make the topping.  Mix strawberries with the sugar in a medium bowl.  This is unnecessary if the strawberries are sweet or you would like a tarter flavor.  Beat cream cheese, confectioners’ sugar and vanilla in a large bowl on high until the mixture is creamy.  Scrape down the sides of the bowl and gradually add the whipping cream while beating on low.  Increase speed to high and beat until soft peaks form.  Beat in strawberries for about 30 seconds.

Place one layer of the cake on a cake plate.  Spread with half the topping.  Add the second layer.  Spread with remaining topping.  Garnish with a cut strawberries or additional strawberries.  Chill at least two hours before serving.  Cake must be refrigerated.

Thursday, July 14, 2011

Strawberries

How can one word invoke such astounding feelings and memories?  For me I have always loved eating strawberries and I even have a small strawberry patch.  Easting sun ripened strawberries is always a great summer treat, but I met my match when I tasted Norwegian and Finnish strawberries.  I have to assume that their cold winters and slow growing season does something different to their berries.

I visited Finland for the first time in 2004 and never have I fell so hard for a strawberry, so this summer when I returned to Finland, I mentioned to my friends that I had to eat Finnish strawberries.  I was so desperate that I wanted to bring them home with me, but alas I could not.  So within hours of arriving in Finland, I tasted the first Finnish strawberries I had eaten in 7 years.  They were even better than I remembered.  They are so juicy that they just melted in your mouth.  They tend to be smaller than our strawberries here and sweeter.  So sweet and fragrant that you could never believe it.  My friend's mom told me where to find the wild ones at their summer cabin and those are the ones pictured here.  If you ever have a chance or happen to find yourself in Finland, you would be missing out if you don't eat their strawberries.  More than half the days I was in Finland I ate strawberries and the first was as good as the last.

Monday, May 30, 2011

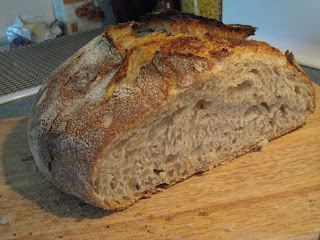
Fresh Artisan Bread

Baking yeast goods never appealed to me, and when I would attempt baked cinnamon rolls or other things that had to rise it daunted me.  I was afraid that whatever I baked would turn out in a flat lump of hard dough.  I admit I did have unsuccessful tries as well.  When I moved to a city with a high altitude, I really didn't want to experiment with yeast goods and have to adjust the recipe.  Fortunately, I first stumbled upon an Irish soda bread recipe which didn't need to be adjusted and it wasn't your typical soda bread in that it was made with spelt and had a variety of seeds in it.  Since I like out of the ordinary and it wasn't a bread that I had to wait and let rise, I knew that it would be a good start to baking bread at a high altitude.

The Irish soda bread was a success and so started my desire to attempt to make more bread, even if I had to work with adjustments at a high altitude.  First, I dug out a Julia Child book to master a french loaf.  That under taking took most of a day to master, but I was as amazed as my boyfriend when the bread had been baked and it actually tasted like French bread.  It didn't rise like I had wanted it to and I wasn't equipped to handle making bread, but it was a success that I later decide I wanted to repeat.

So I started reading...I read a book about a man who baked bread for a year.  He was a novice so I figured if he could do it, so could I.  I started researching a couple of books so I could make a purchase and it came down to Tartine Bread by Chad Robertson.  I read through the first part about how to bake bread at home.  It included everything that I would need for supplies, the procedure I would need to learn, tons of photos so you know what the goal was, but the part that stood out was that there were people that had used this recipe and it also worked for them.  What was amazing is, that although I live at altitude, although I was worried about making a good and successful loaf of bread, although the leaven hadn't been ready the first time I attempted to bake the bread, it worked!
My very own first loaf of artisan bread.  The best part was that the bread crackled as it cooled and the crumb had very nice bubbles in them, despite it being the first time I attempted this kind of bread.  I encourage you also to try out baking your own loaf of bread.  And this recipe makes two loaves so you can take one with you to share with friends.

Tuesday, May 17, 2011

Chicken Enchiladads Verde

Since I am still stuck on Pam Anderson's Perfect One Dish Dinner cookbook, here is another easy to prepare recipe for chicken enchiladas. I really love enchiladas and though this is simple to prepare, I think I need to tweek it a little next time as I like it spicier than this version. I should have tried out the salsa verde before I made it with them, but oh well. You can always spice it up afterward with some lovely chipotle tabasco sauce or just some spicier salsa which is what I did. I also think that if the chicken is cooked in advance, letting it sit in salsa over night or for a little while before throwing it all together would help the flavors mesh together better.


4 cups cooked chicken
4 cups green chile salsa
1 can diced tomatoes with green peppers and onions
8 ounces cheese, I prefer sharp cheddar for more flavor, but you can use a milder one as well
Fresh cilantro (I like a sprinkle, but you can add more if you like the flavor)
Corn tortillas (16 or more to fit your pan)
½ onion, chopped
Sour cream for garnish


Heat oven to 400F. Mix chicken with diced tomatoes and onions. Add half the green chile salsa and stir together well. Add 1 ½ cups cheese, sprinkle of cilantro and salt and pepper to taste. Spread one cup salsa in baking dish.
Wrap tortillas in a damp paper towel and microwave on high until warm, about 30-45 seconds. Spoon in chicken filling and roll. Place seam side down into your baking pan. Fill the rest of the tortillas. Spread another 1 1/2 cups salsa over the tortilla rolls, then sprinkle with the remaining cheese. Cover with aluminum foil sprayed with cooking oil to prevent sticking. Bake for about 30 minutes or until heated throughout. Sprinkle onion slices and a little more cilantro. Let stand for a few minutes and then serve with sour cream and salsa.

Monday, May 16, 2011

Cassoulet-Style Italian Sausages and White Beans

After not posting for a while, I am back and determined to keep this up with some regularity. Where have I been you might ask? I spent some time in Hong Kong, eating and relaxing. Then once I returned home, I decided that I better get in some training runs for my up and coming races. With one half marathon completed yesterday in the drizzle and 39F once I returned to the car (and I have no idea how cold it was at the start), I thought I would take some recovery time to post. Thinking about protein and easy to prepare meals, this one is very good on both accounts.

Cassoulet-Style Italian Sausages and White Beans come from Pam Anderson's Perfect One-Dish Dinner and below is my version of it. This book contains meals which are easy to prepare with delicious results. I like to tweak things to make them to my tastes, so here is my version of it. The roasted sausage in the olive oil and balsamic vinegar is divine. Try it and enjoy!


1 pound spicy Italian sausage
1 pound cherry tomatoes
1 can diced tomatoes with onions and peppers
1 medium onion, cut into about 1 inch pieces
2 teaspoon diced garlic
3 tablespoons olive oil
1 ½ tablespoons balsamic vinegar
2 teaspoons dried thyme
2 bay leaves
3 canned white bean (I used great northern and pinto)

Preheat oven to 425F. Mix sausage pieces, tomatoes, onion, garlic, olive oil, vinegar, thyme, bay leaves and sprinkling of sea salt and freshly ground pepper in a roasting pan. Roast until sausages are brown and tomatoes have thickened. This takes about 30-40 minutes. Remove from oven, stir in white beans and roast until everything is heated through. Remove from oven, remove bay leaves and serve. Serves 6-8.